Now you have installed and set up WooCommerce on your WordPress website, it’s time to start adding products to your shop.
Adding new products to your shop is relatively easy, but there’s a lot of options! It might be a little overwhelming if it’s your first time setting up products using WooCommerce, so I’ve created this comprehensive guide to talk you through everything you need to know.
We will start by looking at the different product types available in WooCommerce, and then we will look at categories, tags and attributes. Finally I’ll show you how to set a product and what information is required for each different type of product.
Product types in WooCommerce
The first thing I want to talk about is product types. WooCommerce allows you to create a number of different types of products based on what you are selling, and whether the product is physical or digital:
Simple product
A simple product is the most basic type of product that you can create with WooCommerce. Simple products can be physical products (i.e. that you actually ship to a customer) or digital. Digital products can come in two forms…
- Virtual – Not a physical item and it does not require shipping. For example, a service.
- Downloadable – A product that can be downloaded by a customer after they have purchased it. For example, a pre-made WordPress theme.
Grouped product
Group products are groups of related simple products that you want to sell together as a part of a package. Products in a group can be sold separately as well as being sold as a part of a group.
External/Affiliate product
External products are products that are actually sold somewhere else. These products are listed in your store, but if someone clicks on this product, they will be redirected to the website where the product is actually for sale.
Variable product
A variable product is a product with variations. For example, one style of shoes might be available in different sizes, or in different colours. These different sizes and colours would be variations.
Categories and Tags in WooCommerce
Products can have categories and tags just like blog posts can. However, the categories and tags for products are different to those of blog posts and therefore you will need to create new categories and tags.
To create and manage your product categories and tags, hover over Products in the left hand menu and click Categories or Tags.
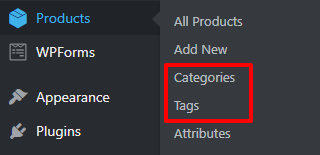
As you will see, the two pages are almost exactly the same at the post categories and tags pages.
I say almost because you may notice that the categories page has two extra options.
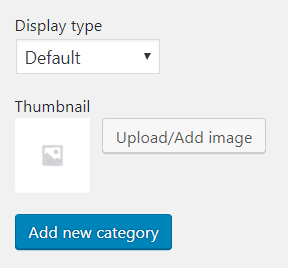
The first of these options is Display type. This allows you to choose what is shown on the category landing page of your shop.
The second is the option to assign a thumbnail image to a category. In the Customise section of WordPress (Appearance > Customise) under the WooCommerce tab you have the option to choose what you show on the shop page. If you choose to show categories it will show this image (unless your theme has been set to not show this image).
As with blog posts, categories and tags can be added directly on the product page itself (which I will show you later).
Attributes in WooCommerce
Attributes are similar to categories and tags in that they provide a way of grouping products together, but attributes tend to be used more for grouping together similar features of a products.
So, say for example you run an online shop that sells shoes. You might choose to create an attribute for colour. You can then assign terms to the attribute, so for colours the terms you might use would be blue, green, yellow, red, etc.
These attributes and terms can then be used with the Filter by Attribute widget to allow users to narrow down their search (I’ll be talking more about WooCommerce widgets in another post later in this series).
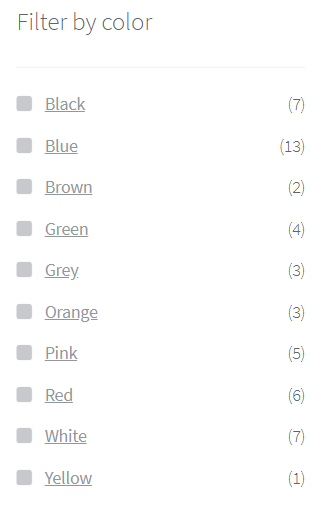
Attributes are also essential in the creation of variable products.
Let’s continue to use the shoe shop example. One style of shoe might be available in different sizes. In this case, you would create an attribute called size, and then the terms that you would assign to this attribute would be shoe sizes.
Then, when you set up your variable product, you can use the size attributes to create variations of the product. On the front-end of the website, this will create a drop down list so that the user can select which variation of the product that they wish to purchase.

Unlike categories and tags, attributes can not be set up on the product page. Instead, they must be set up on the attributes page. To access this, hover over Products and click Attributes.
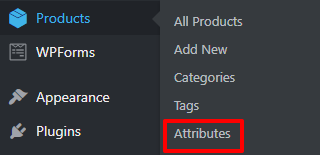
Similarly to the categories and tags pages, on the left hand side is a form when you can create an attribute, and on the right hand side is a life of attributes you have created.
To create an attribute, start by giving it a name. I’m going to call mine Colour. Then give your attribute a slug. If you don’t enter one, don’t worry. One will be automatically generated for you.
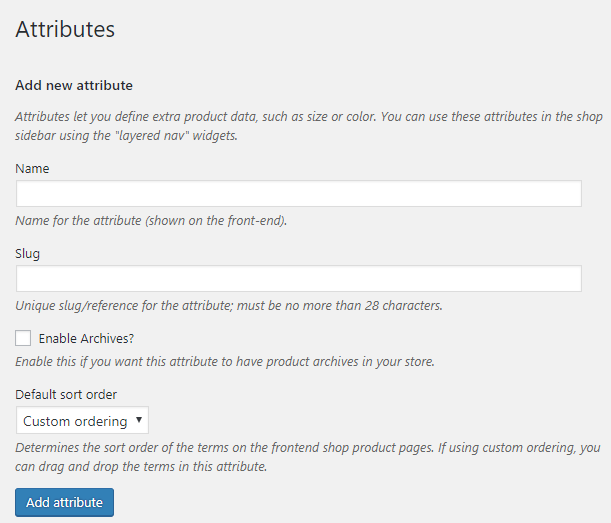
After creating your attribute you will see it on the right hand side of the screen.
The next step is to add terms or values to that attribute. So, for the colour attribute, we would add terms that are colours such as red, blue, yellow, green, etc.
To add these terms, hover over the attribute and click Configure terms.

This will take you to a page which again looks very similar to the categories, tags and attributes pages. However, this page is the terms page for the specific attribute you have selected.
To create a term, simply enter a name, a slug (again, if you don’t enter one it will be automatically generated for you) and enter a description (not all themes will show this).
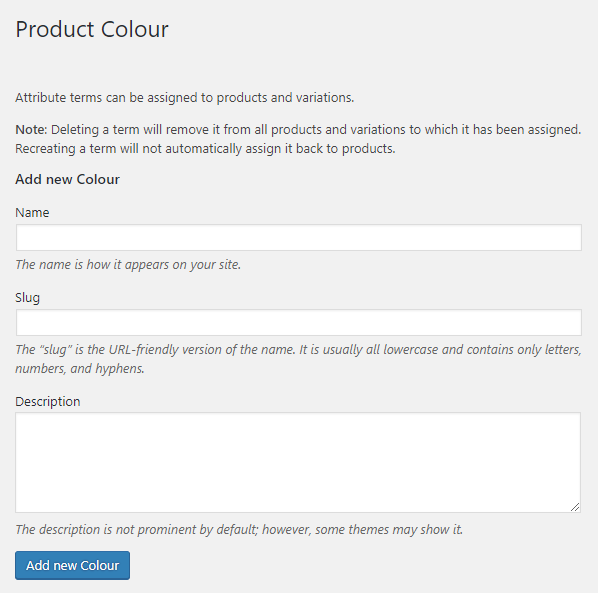
When you are done, click Add new *name of attribute*, and then you will see your new term on the right hand side of the page.
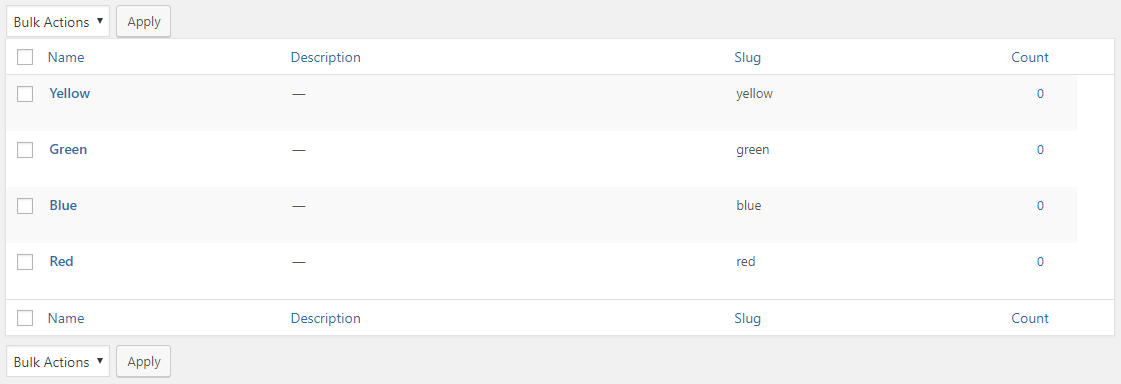
We will look at how we use these to create variable products later in the post.
Adding new products to your WooCommerce shop
Right, now we’ve got all of that important information out of the way, let’s create a product!
To add new products to your shop, hover over Products in the left hand menu and click Add New.
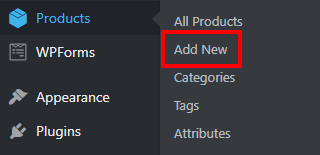
You will then be taken to the Add new product page. It looks very similar to a normal new post or page in WordPress, but there are a few difference which you will notice as you scroll down the page.

Product name and Product description
The title box, where you would normally write the name of the post or page, is where you enter a name for your product, and the content box, where you would normally write the content for the post or page, is where you write a your detailed product description. You can use all the formatting options that you would normally use on a post or page.
Publish
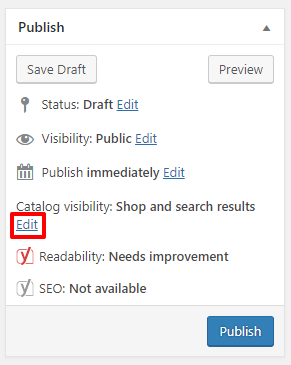
The Publish box on the product page is a little bit different to the one on posts and pages.
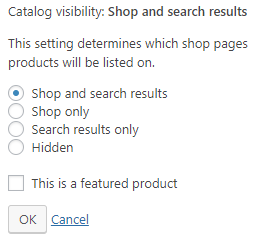
There is an extra setting called Catalogue visibility, and this allows you to choose which pages you would like to see this product on. Click Edit next to this to see all the available options.
You will also notice a tickbox that says This is a featured product. Featured products can be displayed on your website using widgets or shortcodes.
Product categories and Product tags
On the right hand side you will see Product categories and Product tags sections. Just like with blog posts, you can create new categories and tags within the product page itself.

Product image and Product Gallery
As you continue to scroll down the product page you will two sections that relate to product imagery: Product Image and Product gallery.
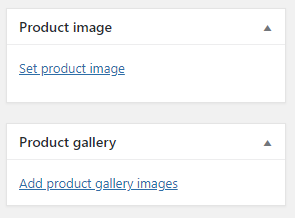
The product image is much like the featured image of a blog post. It’s the main image that represents the product you are selling.
The product gallery is for any additional photos of the product you want to show. So you might upload pictures of the product from different angles, or show any extras or different parts of the product separately.
Product data
The product data section of the product page is probably be the most important section. It contains all the important information about your product including the product type, prices, shipping information, inventory, product variations, etc.
Product short description
The last section on the page is the Product short description. Here you can enter a shorter description that provides a quick summary of the product.

If you have Yoast SEO installed…
If you have Yoast SEO installed, you will also see the content analysis section. You can use this in the same way your would for a blog post or page on your WordPress site. If you don’t have Yoast SEO installed, I highly recommend you do.
Product data
As I mentioned just a few paragraphs ago, the product data section of the product page is very important, hence why it deserves its very own section in this post!
First things first, you need to select the product type for your product. The simple product type is selected by default.
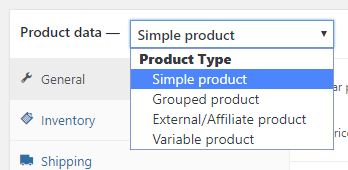
If you are selling a virtual or downloadable product, make sure you select either virtual or downloadable. Only simple products can be virtual or downloadable products so you’ll notice that this options will be removed when you choose a different product type.

Next you will see a number of tabs. These tabs, and their contents, will vary depending on which product type you have selected.
For simple products…
There are 6 tabs for simple products.
The General tab is where you set the price of the product. As well as setting a regular price, you can also set a sale price, and you can even choose when the price of the product changes to the sale price.

The Inventory tab contains all the information about the stock levels. You can either choose to manage stock by ticking the “Manage stock?” checkbox and by entering the number of products you have for sale, or you can just set the stock status to say whether the product is in stock, out of stock, or on backorder. Alternatively, if you are selling a product as a one off, you can tick the checkbox next to “Sold individually”.
In the Inventory tab you can also set something called SKU which stands for Stock Keeping Unit. This is an identification code for a product, and in physical shops it’s usually found in the format of a barcode.

The Shipping tab is where you set the weight and dimensions of the product, and where you can choose a shipping class if you have shipping classes set up. Shipping classes must be set up in settings (WooCommerce > Settings > Shipping > Shipping classes) but we will discuss this in another post in the series.

On the Linked Products tab you will see two options. The first is Upsells, where you can choose products that you would recommend to the customer instead of the current product they are looking at. On the product page this will display the product under a “You may also like…” heading.
The second option is Cross-sells. Here you can choose a product that you want to show on in the cart/basket under a “You may be interested in…” heading.

The Attributes tab is where you can assign attributes that you have previously created. Firstly, you will need to choose an attribute from the dropdown list.

Then you will need to choose which values of that attribute apply to your product. Just start typing into the values box to see values that you have already set up.
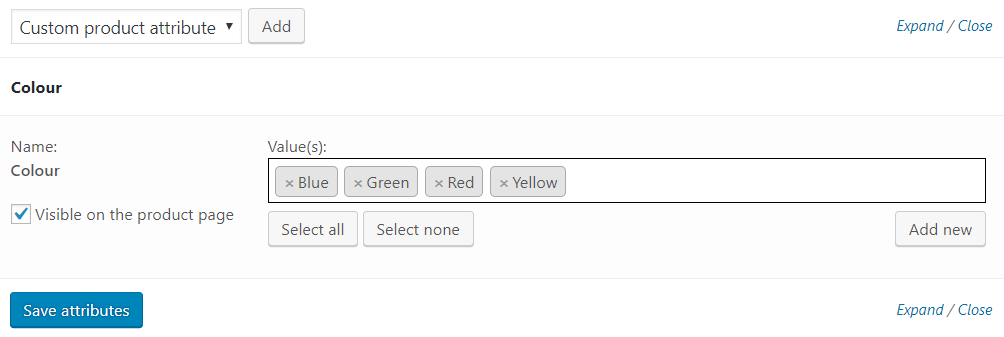
Finally, the Advanced tab. Here you can add a purchase note, which will be sent to the custom after they make a purchase, set the menu order for custom ordering, and choose whether or not you want to enable reviews for the product.

For grouped products…
If you choose to create a grouped product you won’t see the General and Shipping tabs, because this information will come from the individual products. And it is for this reason you won’t see the Manage stock or Sold individually options under the Inventory tab, or the purchase note option under the Advanced tab.
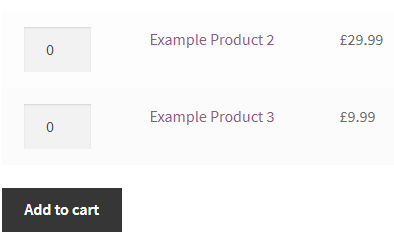
However, under the Linked Products tab you will see a grouped products option instead of the cross-sell option. Here you can choose which products you would like to add to your group. On the front-end of your website, grouped products look like this:
For external/affiliate products…
If you choose to create an external/affiliate product you won’t see the Shipping tab because the product will be sold elsewhere and you won’t have to handle shipping. You’ll also notice that you have less options on the Inventory tab because you won’t have any control over stock levels, and on the Linked Products tab there is no cross-sell option.
Something you will see on the General tab for external/affiliate products that you won’t see for any other product type is the place to add the URL of the product you are linking out to. You can also change the text that appears on the button that links to the external product.

For variable products…
If you choose to create a variable product you won’t see the General tab, because you will be setting the price for each variation, even if you choose to make all variations the same price. This is also the reasons why under the Inventory tab you won’t have the stock status option, and again this must be set for each individual variation.
However, you will see the Variations tab where you can set up all the variation options for your product.

But before you can add variations, you need to add some variation attributes to the product via the Attributes tab.
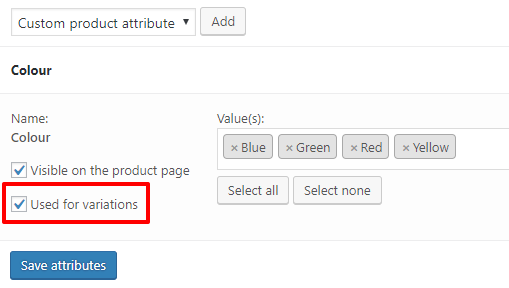
Once you have added your attributes and values to the product, tick the checkbox that says Used for variations, click Save Attributes, and return to the Variations tab.
Back on the Variations tab you will need to add the attributes that you want to create variations for. You can add variations individually, but the quickest way to add variations is to choose Create variations from all attributes. This will create variations for all the attributes you have added via the Attributes tab.

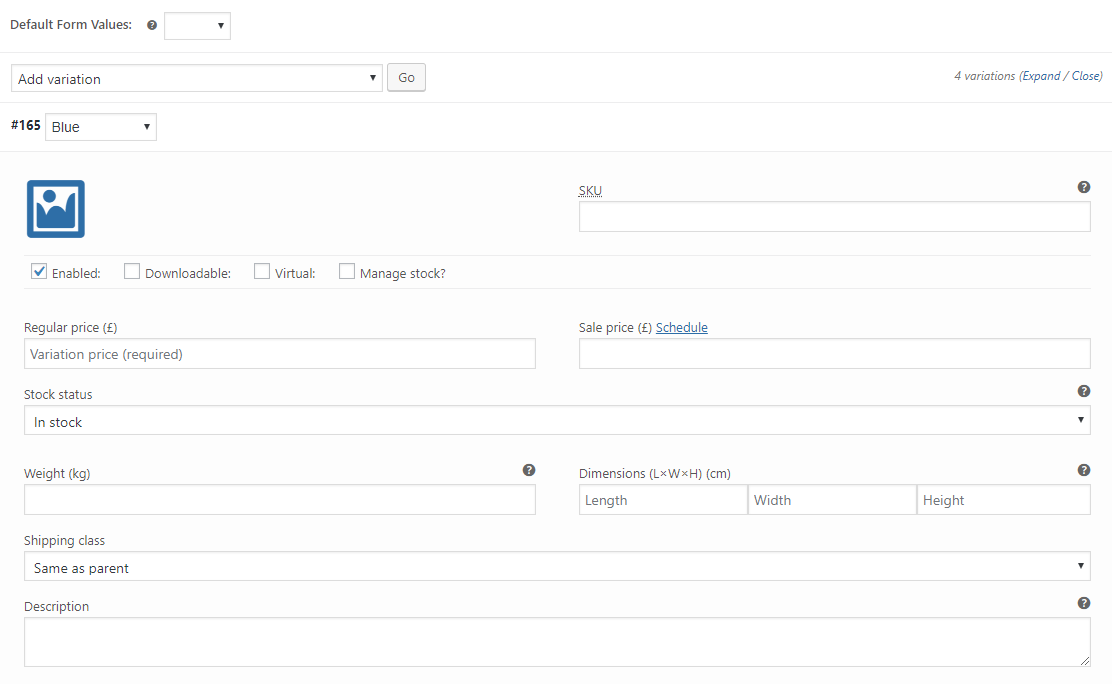
To edit a variation, click on the drop-down arrow next to the specific variation that you want to edit.

This will then open up the options for this variable. As you can see you give a variation of a product its own price, images, stock status, weight, dimensions and description. You can even make variable a virtual of downloadable product if you wish.
After you have added your product variations, preview your product page and you will see that the product variations are shown in a drop-down list, allowing customers to choose the variation they would like to purchase.
For virtual products…
If you choose to create a virtual product then the Shipping tab will be removed, because there’s no product to ship!
Apart from that, all other options and settings for virtual products are the same as they are for a normal simple product.
For downloadable products…
If you choose to sell a downloadable product then you need to upload the files that your customer will received after they make their purchase. You can also set a download limit to limit the amount of times that the customer can download the files, and you can add an expiry date for the download link. This means that after this date the customer will no longer be able to download the files.

All the other options and settings for downloadable products are exactly the same as they are for a simple, physical product.
Need some help?
If you need any help with setting up a WooCommerce shop, or with making changes to the appearance of your shop? I offer WooCommerce support as a part of my WordPress Maintenance and Updates services. Get in touch to find out more.



Like!! Thank you for publishing this awesome article.